Online course detail

React JS Training in Gurgaon
React helps you to build powerful, fast, user-friendly, and reactive web apps that provide amazing user experiences by leveraging the power of JavaScript with ease. Training will help you gain expertise in styling react elements and components, Burger builder, the multi-page user interface in a single-page-app, redux, react-router.
Instructor Led Training | Free Course Repeat | Placement Assistance | Job Focused Projects | Interview Preparation Sessions
Curriculum
Topics to be covered
- Introduction
- What is React?
- Real-World SPAs & React Web Apps
- Writing our First React Code
- Why Should we Choose React?
- React Alternatives
- Understanding Single Page Applications and Multi Page Applications
- Course Outline
- How to get the Most out of This Course
- Useful Resources & Links
React JS Training gives far-reaching guidance on building web applications utilizing the React library. Members learn centre ideas, part-based improvement, state the board, and best practices for making current and versatile applications with React.
This module will give you an overview of
- Module Introduction
- Understanding "let" and "const"
- Arrow Functions
- Exports and Imports
- Understanding Classes
- Classes, Properties and Methods
- The Spread & Rest Operator
- Destructuring
- Reference and Primitive Types Refresher
- Refreshing Array Functions
- Wrap Up
- Next-Gen JavaScript - Summary
- JS Array Functions
Refreshing Cutting edge JavaScript (Discretionary) in React JS Training centres around acquainting members with current JavaScript highlights and punctuation, for example, bolt works, destructuring, spread administrators, and commitments. This information upgrades their capability to record as a hard copy proficient and succinct code while working with React.
This module will give you an overview of
- Module Introduction
- The Build Workflow
- Using Create React App
- Understanding the Folder Structure
- Understanding Component Basics
- Understanding JSX
- JSX Restrictions
- Creating a Functional Component
- Components & JSX Cheat Sheet
- Working with Components & Re-Using Them
- Outputting Dynamic Content
- Working with Props
- Understanding the Children Property
- Understanding & Using State
- Props & State
- Handling Events with Methods
- To Which Events Can You Listen?
- Manipulating the State
- Functional (Stateless) vs class (Stateful) Components
- Passing Method References Between Components
- Adding Two Way Binding
- Adding Styling with Stylesheets
- Working with Inline Styles
Figuring out the Base Highlights and Grammar in React JS Training gives members a strong groundwork for React improvement. They learn key ideas, language structure, and highlights like JSX, parts, props, state, lifecycle strategies, and occasions dealing with, empowering them to construct React applications successfully.
This module will give you an overview of
- Module Introduction
- Rendering Content Conditionally
- Handling Dynamic Content "The JavaScript Way"
- Outputting Lists (Intro)
- Outputting Lists
- Lists & State
- Updating State Immutably
- Lists & Keys
- Flexible Lists
- Wrap Up
- Time to Practice - Lists & Conditionals
Working with Records and Conditionals in React JS Training covers the execution of dynamic records and restrictive delivery in React applications. Members figure out how to proficiently deliver arrangements of information, handle key props, and restrictively show parts given specific circumstances, improving the adaptability and intuitiveness of React applications.
This module will give you an overview of
- Module Introduction
- Outlining the Problem Set
- Setting Styles Dynamically
- Setting Class Names Dynamically
- Adding and Using Radium
- Using Radium for Media Queries
- MUST READ: Enabling CSS Modules
- Enabling & Using CSS Modules
- More on CSS Modules
- Adding Pseudo Selectors
- Working with Media Queries
- Useful Resources & Links
Styling React Parts and Components in React JS Training centres around strategies to apply CSS styles to React parts and components. Members learn inline styles, CSS modules, and famous styling libraries to make outwardly engaging and responsive UIs inside React applications.
This module will give you an overview of
- Module Introduction
- Understanding Error Messages
- Finding Logical Errors by using Dev Tools & Sourcemaps
- Working with the React Developer Tools
- Using Error Boundaries (React 16+)
Troubleshooting React Applications Training in React JS Training outfits members with strategies to troubleshoot React applications. They figure out how to recognize and determine normal blunders, use investigating devices, and carry out prescribed procedures for investigating and streamlining React code.
This module will give you an overview of
- Module Introduction
- A Better Project Structure
- Splitting an App Into Components
- Comparing Stateless and Stateful Components
- Understanding the Component Lifecycle
- Converting Stateless to Stateful Components
- Component Creation Lifecycle in Action
- componentWillUnmount()
- Component Updating Lifecycle Hooks
- Component Updating Lifecycle in Action
- Updating Lifecycle Hooks (Triggered by State Changes)
- Performance Gains with PureComponents
- How React Updates the App & Component Tree
- Understanding React's DOM Updating Strategy
- Windows Users Must Read - File Downloads
- Returning Adjacent Elements (React 16+)
- React 16.2 Feature: Fragments
- Understanding Higher Order Components (HOCs)
- A Different Approach to HOCs
- Passing Unknown Props
- Using setState Correctly
- Validating Props
- Available PropTypes
- Using References ("ref")
- More on the React ref API (16.3)
- The Context API (React 16.3)
- More on the Context API (16.6)
- Updated Lifecycle Hooks (React 16.3)
- The "memo" Method (16.4)
Jumping Further into Parts and React Inward in React JS Training digs into cutting-edge points like higher-request parts, setting Programming interface, React snares, execution improvement, and React internals, engaging members to construct more perplexing and effective React applications.
This module will give you an overview of
- Module Introduction
- Understanding Http Requests in React
- Understanding our Project and Introducing Axios
- Creating a Http Request to GET Data
- Rendering Fetched Data to the Screen
- Transforming Data
- Making a Post Selectable
- Fetching Data on Update (without Creating Infinite Loops)
- POSTing Data to the Server
- Sending a DELETE Request
- Fixing a Bug
- Handling Errors Locally
- Adding Interceptors to Execute Code Globally
- Removing Interceptors
- Setting a Default Global Configuration for Axios
- Creating and Using Axios Instances
The Burger Developer (Essential Form) in React JS Training guides members in building a total burger-requesting application utilizing React. They learn to state the board, structure taking care of, directing, and other key ideas while fostering a utilitarian burger developer application.
This module will give you an overview of
- Module Introduction
- Planning an App in React - Core Steps
- Planning our App - Layout and Component Tree\
- Planning the State
- Setting up the Project
- Creating a Layout Component
- Starting Implementation of The Burger Builder Container
- Adding a Dynamic Ingredient Component
- Adding Prop Type Validation
- Starting the Burger Component\
- Outputting Burger Ingredients Dynamically\
- Calculating the Ingredient Sum Dynamically
- Adding the Build Control Component
- Outputting Multiple Build Controls
- Connecting State to Build Controls
- Removing Ingredients Safely
- Displaying and Updating the Burger Price
- Adding the Order Button
- Creating the Order Summary Modal
- Showing & Hiding the Modal (with Animation!)
- Implementing the Backdrop Component
- Adding a Custom Button Component
- Implementing the Button Component
- Adding the Price to the Order Summary
- Adding a Toolbar
- Using a Logo in our Application
- Adding Reusable Navigation Items
- Creating a Responsive Sidedrawer
- Working on Responsive Adjustments
- More about Responsive Adjustments
- Reusing the Backdrop
- Adding a Sidedrawer Toggle Button
- Adding a Hamburger Icon
- Improving the App - Introduction
- Prop Type Validation
- Improving Performance
- Using Component Lifecycle Methods
- Changing the Folder Structure
Contacting the Internet (HTTP/Ajax) in React JS Training shows members how to make HTTP demands and handle AJAX cooperations inside React applications. Furthermore, they figure out how to bring information from APIs, handle reactions, and update the UI powerfully with the recovered information.
This module will give you an overview of
- Module Introduction
- Firebase & The Right Database
- Creating the Firebase Project
- Creating the Axios Instance
- Sending a POST Request
- Displaying a Spinner while Sending a Request
- Handling Errors
- Retrieving Data from the Backend
- Removing Old Interceptors
- Useful Resources & Links
Getting to a Server in React JS Training shows members how to associate their burger developer application to a backend server. They figure out how to send and recover information from the server, handle validation, and oversee the state utilizing Revival or other state-the-board arrangements.
This module will give you an overview of
- Module Introduction
- Routing and SPAs
- Setting Up Links
- Setting Up the Router Package
- react-router vs react-router-dom
- Preparing the Project For Routing
- Setting Up and Rendering Routes
- Rendering Components for Routes
- Switching Between Pages
- Using Links to Switch Pages
- Using Routing-Related Props
- The "withRouter" HOC & Route Props
- Absolute vs Relative Paths
- Absolute vs Relative Paths (Article)
- Styling the Active Route
- Passing Route Parameters
- Extracting Route Parameters
- Parsing Query Parameters & the Fragment
- Using Switch to Load a Single Route
- Navigating Programmatically
- Additional Information Regarding Active Links
- Understanding Nested Routes
- Creating Dynamic Nested Routes
- Redirecting Requests
- Conditional Redirects
- Using the History Prop to Redirect (Replace)
- Working with Guards
- Handling the 404 Case (Unknown Routes)
- Loading Routes Lazily
- Lazy Loading with React Suspense (16.6)
- Routing and Server Deployment
- Time to Practice – Routing
Multi-Page-Feeling in a Solitary Page-Application: Steering in React JS Training covers progressed directing ideas utilizing React Switch. Members figure out how to execute settled courses, dynamic directing, course monitors, and routes, empowering the making of multi-page-like encounters inside a solitary page React application.
This module will give you an overview of
- Module Introduction
- Building the Checkout Container
- Setting Up Routing & Routes
- Navigating to the Checkout Page
- Navigating Back & To Next Page
- Passing Ingredients via Query Params
- Navigating to the Contact Data Component
- Order Submission & Passing Data Between Pages
- Adding an Orders Page
- Implementing Navigation Links
- Fetching Orders
- Outputting the Orders
Adding Directing to our Burger Task in React JS Training shows members how to steer in the burger manufacturer application. They figure out how to arrange courses, make route joins, and progressively render various parts in light of the ongoing course, improving the general client experience.
This module will give you an overview of
- Module Introduction
- Analyzing the App
- Creating a Custom Dynamic Input Component
- Setting Up a JS Config for the Form
- Dynamically Create Inputs based on JS Config
- Adding a Dropdown Component
- Handling User Input
- Handling Form Submission
- Adding Custom Form Validation
- Fixing a Common Validation Gotcha
- Adding Validation Feedback
- Improving Visual Feedback
- Showing Error Messages
- Handling Overall Form Validity
- Working on an Error
Structures and Structure Approval Training in React JS covers the execution of structure dealing with and approval in React applications. Members figure out how to make controlled and uncontrolled structures, handle client input, execute approval rationale, and show blunder messages, guaranteeing information uprightness and easy-to-understand structures.
This module will give you an overview of
- Module Introduction
- Understanding State
- The Complexity of Managing State
- Understanding the Redux Flow
- Setting Up Reducer and Store
- Dispatching Actions
- Adding Subscriptions
- Connecting React to Redux
- Connecting the Store to React
- Dispatching Actions from within the Component
- Time to Practice - Dispatching Actions
- Passing and Retrieving Data with Action
- Switch-Case in the Reducer
- Updating State Immutably
- Updating Arrays Immutably
- Immutable Update Patterns
- Outsourcing Action Types
- Combining Multiple Reducers
- Understanding State Types
- Time to Practice - Redux Basics
- Combining Local UI State and Redux
Revival Training in React JS covers the execution of Revival for the state of the executives in React applications. Members figure out how to make activities, minimizers, and the Revival store, empowering unified state the executives and effective information stream inside their React projects
This module will give you an overview of
- Module Introduction
- Installing Redux and React Redux
- Basic Redux Setup
- Finishing the Reducer for Ingredients
- Connecting the Burger Builder Container to our Store
- Working on the Total Price Calculation
- Redux & UI State
- Adjusting Checkout and Contact Data
Adding Revival to our Venture in React JS Training guides members on coordinating Revival for the state of the executives in their React applications. They figure out how to set up the Revival store, characterize activities and minimizers, and associate parts to Revival, empowering the effective and versatile state of the board.
This module will give you an overview of
- Module Introduction
- Adding Middleware
- Using the Redux Devtools
- Executing Asynchronous Code - Introduction
- Introducing Action Creators
- Action Creators & Async Code
- Handling Asynchronous Code
- Restructuring Actions
- Where to Put Data Transforming Logic?
- Using Action Creators and Get State
- Using Utility Functions
- A Leaner Switch Case Statement
- An Alternative Folder Structure
- Diving Much Deeper
Revival Progressed Training in React JS digs into cutting-edge ideas, for example, middleware, async activities, changelessness, and high-level Revival designs. Members gain a more profound comprehension of Revival and learn progressed procedures for the productive state of the executives in React applications.
This module will give you an overview of
- Module Introduction
- Installing the Redux Devtools
- Preparing the Folder Structure
- Creating Action Creators
- Executing Asynchronous Code
- Fetching Ingredients Asynchronously
- Initializing Ingredients in the BurgerBuilder
- Changing the Order of our Ingredients Manually
- Adding Order Actions
- Connecting Contact Data Container & Actions
- The Order Reducer
- Working on Order Actions
- Redirect to Improve UX
- Combining Reducers
- Handling Purchases & Updating the UI
- Resetting the Price after Purchases
- Fetching Orders (via Redux)
- Checking our Implemented Functionalities
- Refactoring Reducers
- Refactoring Reducers Continued
Burger Task in React JS Training centres around carrying out cutting-edge Revival ideas in the burger developer application. Members figure out how to deal with async activities, execute middleware, use selectors, and enhance the Revival store for a consistent and productive burger-requesting experience.
This module will give you an overview of
- Module Introduction
- Understanding Authentication in Single Page Applications
- Required App Adjustments
- Adding an Auth Form
- Adding Actions
- Getting a Token from the Backend
- Adding Sign-In
- Storing the Token
- Adding a Spinner
- Logging Users Out
- Accessing Protected Resources
- Updating the UI Depending on Auth State
- Adding a Logout Link
- Forwarding Unauthenticated Users
- Redirecting the User to the Checkout Page
- Persistent Auth State with localStorage
- Fixing Connect + Routing Errors
- Ensuring App Security
- Guarding Routes
- Displaying User Specific Orders
Adding Confirmation to our Burger Task in React JS Training shows members how to execute client verification and approval in the Burger developer application. In addition, they figure out how to deal with client enrollment, login, logout, and secure admittance to safeguarded courses utilizing confirmation components like tokens or meeting the board.
This module will give you an overview of
- Module Introduction
- Fixing the Redirect to the Frontpage
- Using updateObject in the Entire App
- Sharing the Validation Method
- Using Environment Variables
- Removing console.log()s
- Adding Lazy Loading
Further developing our Burger Undertaking in React JS Training centres around upgrading the burger manufacturer application by executing extra elements, further developing UI/UX, improving execution, and following prescribed procedures to make a vigorous and clean eventual outcome.
This module will give you an overview of
- Module Introduction
- What is Testing?
- Required Testing Tools
- What To Test?
- Writing our First Test
- Testing Components Continued
- Jest and Enzyme Documentations
- Testing Components Correctly\
- Testing Containers
- How to Test Redux
Testing in React JS Training covers different testing strategies and apparatuses for React applications. Members figure out how to compose unit tests, incorporation tests, and start-to-finish tests utilizing structures like Quip and React Testing Library to guarantee the dependability and nature of their React projects.
This module will give you an overview of
- Module Introduction
- Deployment Steps
- Building the Project
- Example: Deploying on Firebase
Sending the Application to the Internet in React JS Training shows members how to convey their React applications to the web. They learn about facilitating choices, designing form processes, streamlining resources, and sending to stages like Heroku, Netlify, or AWS.
This module will give you an overview of
Course Description
- JavaScript + HTML + CSS fundamentals are required
- You DON'T need to be a JavaScript expert to succeed in this course!
- ES6+ JavaScript knowledge is beneficial but not a must-have
- NO prior React or any other JS framework experience is required!
After completion of React Training, you will be able to:
–Understand the Base Features & Syntax
–Working with Lists and Conditionals
–Styling React Components & Elements
–Debugging React Apps
–Diving Deeper into Components & React Internal
–A Real App: The Burger Builder (Basic Version)
–Reaching out to the Web (Http / Ajax)
–Burger Builder Project: Accessing a Server
–Multi-Page-Feeling in a Single-Page-App: Routing
–Adding Routing to our Burger Project
–Forms and Form Validation
–Redux
–Adding Redux to our Project
–Redux Advanced
–Redux Advanced: Burger Project
–Adding Authentication to our Burger Project
–Improving our Burger Project
–Testing
–Deploying the App to the Web
We at Gyansetu understand that teaching any course is not difficult but to make someone job-ready is the essential task. That's why we have prepared capstone projects which will drive your learning through real-time industry scenarios and help you clearing interviews.
All the advanced level topics will be covered at Gyansetu in a classroom/online Instructor-led mode with recordings.
No prerequisites. This course is for beginners.
- Our placement team will add React JS skills & projects to your CV and update your profile on Job search engines like Naukri, Indeed, Monster, etc. This will increase your profile visibility in top recruiter search and ultimately increase interview calls by 5x.
- Our faculty offers extended support to students by clearing doubts faced during the interview and preparing them for the upcoming interviews.
- Gyansetu’s Students are currently working in Companies like Sapient, Capgemini, TCS, Sopra, HCL, Birlasoft, Wipro, Accenture, Zomato, Ola Cabs, Oyo Rooms, etc.
Gyansetu is providing complimentary placement service to all students. Gyansetu Placement Team consistently works on industry collaboration and associations which help our students to find their dream job right after the completion of training.
- Gyansetu trainers are well known in Industry; who are highly qualified and currently working in top MNCs.
- We provide interaction with faculty before the course starts.
- Our experts help students in learning Technology from basics, even if you are not good at basic programming skills, don’t worry! We will help you.
- Faculties will help you in preparing project reports & presentations.
- Students will be provided Mentoring sessions by Experts.
Certification
React Certification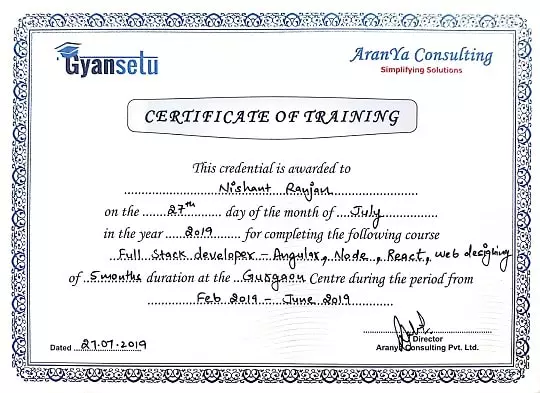
Reviews


Placement

Ankurita
Placed In:

NIIT Technologies
Placed On – February 25 , 2018Review:
I have completed my React JS course in Gurgaon from Gyansetu. My trainer helped me a lot throughout the training. His way of teaching was amazing.

Navneet
Placed In:

Spotify
Placed On – April 12 , 2017Review:
Our Trainer taught me with the best examples which made it easy for me to understand the concepts. If I talk about the staff then everybody was very helpful.

Aarti
Placed In:

Paytm
Placed On – June 01 , 2019Review:
After completing my training I saw a big change in myself not only my technical knowledge has been enhanced but also my communication skills and confidence has been increased.
Enroll Now
Structure your learning and get a certificate to prove it.
Projects
- Module Introduction
- Installing the Redux Devtools
- Preparing the Folder Structure
- Creating Action Creators
- Executing Asynchronous Code
- Fetching Ingredients Asynchronously
- Initializing Ingredients in the BurgerBuilder
- Changing the Order of our Ingredients Manually
- Adding Order Actions
- Connecting Contact Data Container & Actions
- The Order Reducer
- Working on Order Actions
- Redirect to Improve UX
- Combining Reducers
- Handling Purchases & Updating the UI
- Resetting the Price after Purchases
- Fetching Orders (via Redux)
- Checking our Implemented Functionalities
- Refactoring Reducers
- Refactoring Reducers Continued
React JS Training in Gurgaon Features
Frequently Asked Questions
- What type of technical questions are asked in interviews?
- What are their expectations?
- How should you prepare?
We have seen getting a relevant interview call is not a big challenge in your case. Our placement team consistently works on industry collaboration and associations which help our students to find their dream job right after the completion of training. We help you prepare your CV by adding relevant projects and skills once 80% of the course is completed. Our placement team will update your profile on Job Portals, this increases relevant interview calls by 5x.
Interview selection depends on your knowledge and learning. As per the past trend, initial 5 interviews is a learning experience of
Our faculty team will constantly support you during interviews. Usually, students get job after appearing in 6-7 interviews.
- What type of technical questions are asked in interviews?
- What are their expectations?
- How should you prepare?
We have seen getting a technical interview call is a challenge at times. Most of the time you receive sales job calls/ backend job calls/ BPO job calls. No Worries!! Our Placement team will prepare your CV in such a way that you will have a good number of technical interview calls. We will provide you interview preparation sessions and make you job ready. Our placement team consistently works on industry collaboration and associations which help our students to find their dream job right after the completion of training. Our placement team will update your profile on Job Portals, this increases relevant interview call by 3x
Interview selection depends on your knowledge and learning. As per the past trend, initial 8 interviews is a learning experience of
Our faculty team will constantly support you during interviews. Usually, students get job after appearing in 6-7 interviews.
- What type of technical questions are asked in interviews?
- What are their expectations?
- How should you prepare?
We have seen getting a technical interview call is hardly possible. Gyansetu provides internship opportunities to the non-working students so they have some industry exposure before they appear in interviews. Internship experience adds a lot of value to your CV and our placement team will prepare your CV in such a way that you will have a good number of interview calls. We will provide you interview preparation sessions and make you job ready. Our placement team consistently works on industry collaboration and associations which help our students to find their dream job right after the completion of training and we will update your profile on Job Portals, this increases relevant interview call by 3x
Interview selection depends on your knowledge and learning. As per the past trend, initial 8 interviews is a learning experience of
Our faculty team will constantly support you during interviews. Usually, students get job after appearing in 6-7 interviews.
Yes, a one-to-one faculty discussion and demo session will be provided before admission. We understand the importance of trust between you and the trainer. We will be happy if you clear all your queries before you start classes with us.
We understand the importance of every session. Sessions recording will be shared with you and in case of any query, faculty will give you extra time to answer your queries.
Yes, we understand that self-learning is most crucial and for the same we provide students with PPTs, PDFs, class recordings, lab sessions, etc, so that a student can get a good handle of these topics.
We provide an option to retake the course within 3 months from the completion of your course, so that you get more time to learn the concepts and do the best in your interviews.
We believe in the concept that having less students is the best way to pay attention to each student individually and for the same our batch size varies between 5-10 people.
Yes, we have batches available on weekends. We understand many students are in jobs and it's difficult to take time for training on weekdays. Batch timings need to be checked with our counsellors.
Yes, we have batches available on weekdays but in limited time slots. Since most of our trainers are working, so either the batches are available in morning hours or in the evening hours. You need to contact our counsellors to know more on this.
Total duration of the course is 60 hours (30 hours of live instructor-led-training and 30 hours of self-paced learning).
You don’t need to pay anyone for software installation, our faculties will provide you all the required softwares and will assist you in the complete installation process.
Our faculties will help you in resolving your queries during and after the course.


.webp)